In case you didn't know...the blog has moved!
Alex has recreated my blog in squarespace. Blogger has been a fun platform but it's time to move on, and Alex is a big fan of squarespace. My URL is still the same: www.glowinglightblog.com
I hope you will continue to follow our adventures in 2012 over on the new blog, be sure to update your links so you don't miss a thing. I promise that 2012 is going to be an amazing year and I hope that we can continue to interact and grow together. Thanks for being faithful readers. I am always humbled when someone tells me that they read and enjoy my blog. Those words warm my heart. I'll see you over on the new blog! Be sure to drop a comment over there so I know you're still reading. :-) Be blessed, friends.

Monday, January 02, 2012
Monday, December 26, 2011
Liam's First Christmas
I have to say, Liam's first Christmas was a great success! He received many wonderful gifts (thank you to all!) and had so much fun with family. Alex and I love this little boy so much.


How cute are we in our matching gray/black/green outfits??!!
We hope your Christmas was just as joyous as ours was. We're looking forward to the new year with all its blessings, challenges, victories, and changes. Life just keeps getting better and better.
My handsome men.
Mama and Baby.
Look at those teefers!!!
Sunday, December 25, 2011
Merry Christmas!
The Acevedos are having a wonderful time with family and friends in Miami, but we wanted to drop in and wish you all a very Merry Christmas. It's hard to believe that last Christmas we surprised everyone with the news that we were expecting...and this year we have our handsome Liam with us to celebrate his first Christmas. What a blessing!

We pray that every single one of you enjoys this day to the fullest. Remember to celebrate the wonderful gift we have in Jesus. “Fear not, for behold, I bring you good news of great joy that will be for all the people. For unto you is born this day in the city of David a Savior, who is Christ the Lord."
Saturday, December 24, 2011
Guest Blog: Christmas DIY Gifts
While I'm off enjoying vacation I lined up some guest bloggers to share their Christmas themed posts with you. Up next is my awesome friend, Steph. We became friends in high school physics class. She has beautiful hair, a winning personality, and more artistic talent than anyone I know. Here she shares some fun DIY projects for Christmas gifts. Enjoy!
Hello everyone! I'm Stephanie and I'm on a budget. haha I love giving gifts. I love finding things for everyone dear to me. This year, it can't happen. Its reality. Kinda sucks, but it forces me to get a little creative. Reading through my google reader helps with the inspiration. DIY. It always saves the day. Of course you have to set some time apart to get it all done nicely.
I recently made a book for a couple's wedding. It came out awesome. I'm really proud of it honestly. You can make one too! Here are some pics of the process. Here's a step by step on how to make another kind of book. Be warned...its a bit overwhelming, but if you've got the patience, do it.


Here are other DIY I found at Ruche blog. They look adorable and easy!
These two images pretty much go hand in hand. You can make someone a snow globe! I'm pretty sure they'll love it. Who makes snowglobes??? Nobody, and for you to make one for them will make them feel special.


This DIY is for making Votives or candleholders. Depending on which container you use. You can make a set of candleholders for a couple! They can use it for any occasion around the home, as a tablescape, etc. I'm in love with it. I'm planning on making some for New Year's!

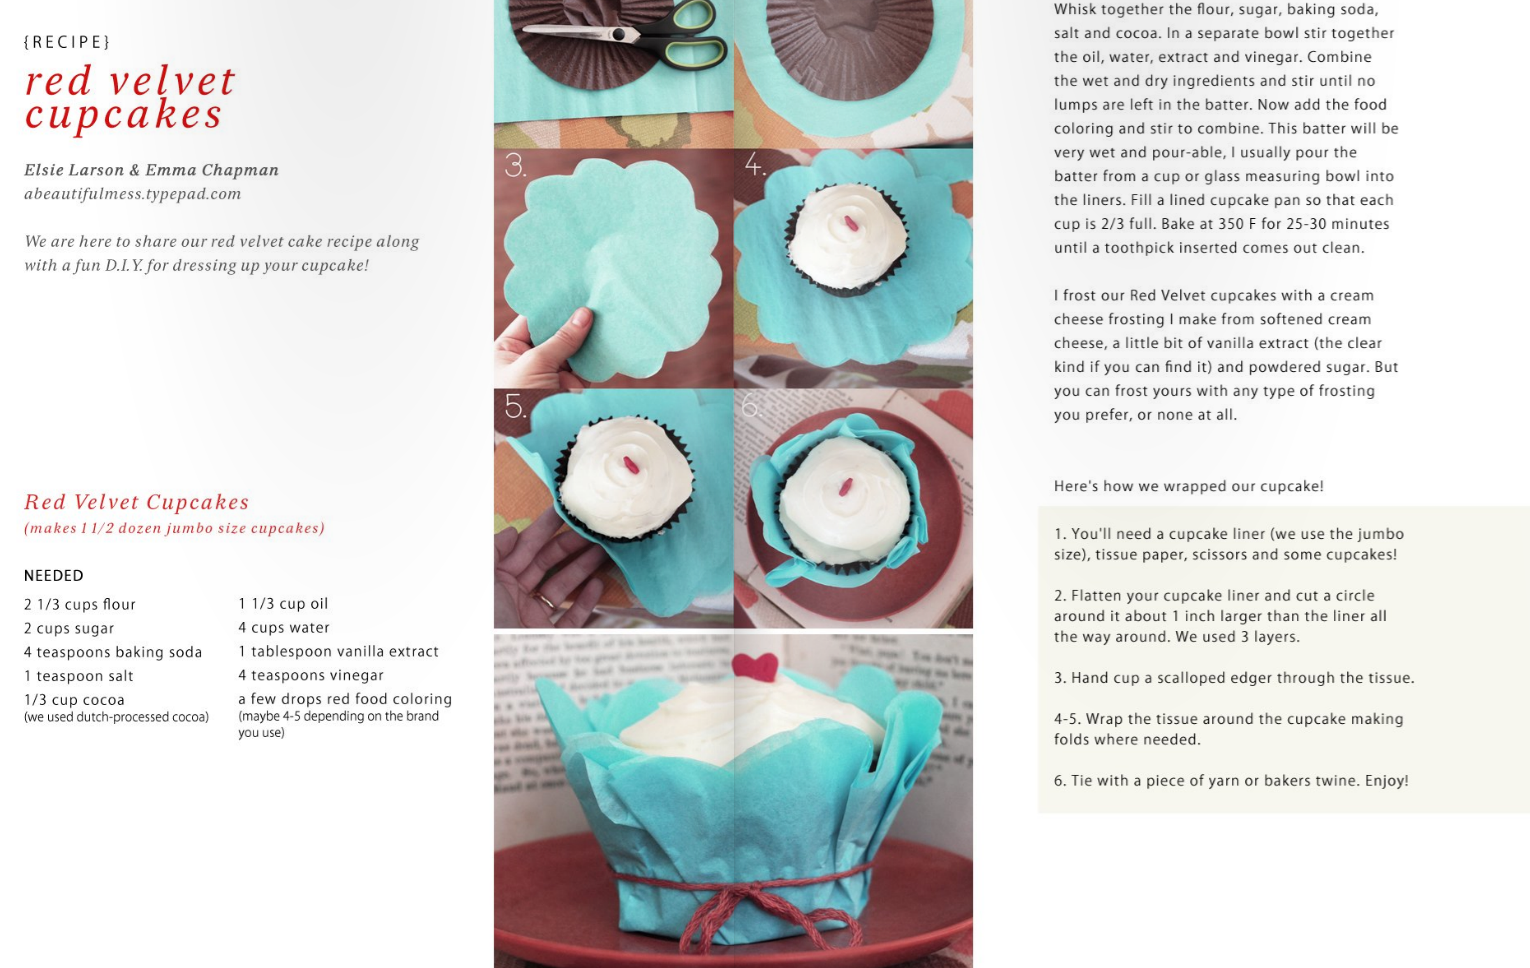
This final one is those of you (including myself) who plan on baking goods as gifts. I love cupcakes! Presentation is important. It's what makes a cupcake a gift instead of an everyday ordinary treat (i have cupcakes a lot haha). The ladies at Red Velvet had this great idea. They even included a little recipe!
Hope you all have a great holiday! DIY it up! <3
Friday, December 23, 2011
Guest Blog: Have Yourself a Crafty Little Christmas
While I'm off enjoying vacation I lined up some guest bloggers to share their Christmas themed posts with you. Next up we have Chanti. I've known Chanti since our high school days and I so admire the woman she has become. She's giving and self-less and creative and talented to boot. You must check out her blog and say hello.
Hello, I'm Chanti from "Live Freely"!
Thank you, Kristel, for inviting me to share a little post on your blog. I live in Miami, FL with my family and 2 dogs, Xena & Rainer. I love coffee, tea, ice cream, books, films, nice people, Jesus and adventures. I'll stop rambling now and get to the good stuff. So, without further ado ... here are a few things that make me terribly happy during Christmas.
DIY Crafts!
DIY Bright lights. This is a great, fun craft for the holiday season. Who doesn't want to have brighter lights than their neighbor? I mean, seriously.


That’s a Wrap!
There's nothing like seeing beautifully wrapped gifts under the tree. I love getting creative when it comes to wrapping gifts. I guess there's just something so sweet about personalizing each package.

Tis the Season to Look Lovely!
So… I can’t say I typically prance around in glitter and heels but, for some reason, the holidays just seem like the perfect time to try something different and fun. Check these outfits out for a little inspiration.


Everything Christmas!
Finally, there’s nothing greater than filling every moment with Christmas cheer and details. These are some favorite things …


Hope you all have a Merry Christmas! Be love, be joy, be happiness for someone who may not be as blessed as you this holiday season.
xx.
Oh Chanti
Thursday, December 22, 2011
Guest Blog: Christmas Decor DIY
While I'm enjoying vacation time I lined up some guest bloggers to share their Christmas themed posts with you. Today we have Megan sharing all about some great Christmas decorating tips. I always love the way Megan decorates her house for all the different seasons and holidays. It's definitely inspired me to decorate my own home. Enjoy!
When Kristel asked me to guest blog for her, I immediately had the idea of sharing all of my pictures of Liam. Sure, they aren't the same quality as Alex and Kristel's pictures of their sweet guy but who wouldn't want to see more pictures of Liam?? Is he not absolutely adorable? I figured it would be best to refrain from doing that, so instead I will share some of my own tips for doing Christmas decorations on a budget. -Try to use what you already own and then incorporate cheap Christmas goodies. For this idea I used a white appetizer plate, votive candles, and candy canes. I already had the votive candles (from showers that I have thrown) and the white appetizer plate came with my dishes. The candy canes are the cheap Christmas goody that I'm talking about here. Candy canes are pretty cheap at around $2 for 2 dozen or so. This is true decorating on a budget people! -Another cheap Christmas item that you can decorate with is Christmas ornaments. I would pick a color scheme and run with it! Some people love silver and white together and some people like non-traditional colors together like pinks and greens and I really like plain old red and green together. Most craft stores will have their ornament sets for 50% off at some point before Christmas so it's a good idea to stock up when there is a sale. I have seen people decorate with lots of ornaments in one vase (like I did) or several small vases with a single ornament in each one. There are lots of directions you could go with this but decorating with ornaments is pretty budget friendly.
 -Stock up on ornaments and stick them in whatever type vases or bowls that you have. Goodwill is a great place to find vases and jars of all sizes.
 -Know what else is cheap and really Christmasy looking?? Bows! I just carried my color scheme right on over when I picked out my bows. I found a bag of bows for $3.50. I threw about 30 or so candy canes in the other apothecary jar so that was probably another $4 or so.
 -Decorate with cranberries! I bought 2 bags of cranberries ($5 total) and threw them in these hurricane jars with candles. These are on my dining room table.
 -If you choose to stay on budget with the majority of your items then you can splurge a little bit on a few things-I chose these kitchen towels and pillow. I would figure out what you want to splurge on and plan around that if you are decorating for the first time. If you decorate with candy canes and cranberries, you might not feel so bad about spending a little extra on a couple of things : )

 I absolute love decorating for Christmas but even more than that I love staying under budget when I decorate. So, figure out the colors that you like and run with it! You can easily have a very Christmasy looking home for the holidays without having to spend a ton of money. Thanks for reading! Head on over to Our Little Urban Life and say Hi! I'd love to hear from you!
And just because I can't help myself, here is a picture of Liam I took when I was babysitting. He's just too cute for me to not include a picture.
I absolute love decorating for Christmas but even more than that I love staying under budget when I decorate. So, figure out the colors that you like and run with it! You can easily have a very Christmasy looking home for the holidays without having to spend a ton of money. Thanks for reading! Head on over to Our Little Urban Life and say Hi! I'd love to hear from you!
And just because I can't help myself, here is a picture of Liam I took when I was babysitting. He's just too cute for me to not include a picture.

When Kristel asked me to guest blog for her, I immediately had the idea of sharing all of my pictures of Liam. Sure, they aren't the same quality as Alex and Kristel's pictures of their sweet guy but who wouldn't want to see more pictures of Liam?? Is he not absolutely adorable? I figured it would be best to refrain from doing that, so instead I will share some of my own tips for doing Christmas decorations on a budget. -Try to use what you already own and then incorporate cheap Christmas goodies. For this idea I used a white appetizer plate, votive candles, and candy canes. I already had the votive candles (from showers that I have thrown) and the white appetizer plate came with my dishes. The candy canes are the cheap Christmas goody that I'm talking about here. Candy canes are pretty cheap at around $2 for 2 dozen or so. This is true decorating on a budget people!
 -Another cheap Christmas item that you can decorate with is Christmas ornaments. I would pick a color scheme and run with it! Some people love silver and white together and some people like non-traditional colors together like pinks and greens and I really like plain old red and green together. Most craft stores will have their ornament sets for 50% off at some point before Christmas so it's a good idea to stock up when there is a sale. I have seen people decorate with lots of ornaments in one vase (like I did) or several small vases with a single ornament in each one. There are lots of directions you could go with this but decorating with ornaments is pretty budget friendly.
 -Stock up on ornaments and stick them in whatever type vases or bowls that you have. Goodwill is a great place to find vases and jars of all sizes.
 -Know what else is cheap and really Christmasy looking?? Bows! I just carried my color scheme right on over when I picked out my bows. I found a bag of bows for $3.50. I threw about 30 or so candy canes in the other apothecary jar so that was probably another $4 or so.
 -Decorate with cranberries! I bought 2 bags of cranberries ($5 total) and threw them in these hurricane jars with candles. These are on my dining room table.
 -If you choose to stay on budget with the majority of your items then you can splurge a little bit on a few things-I chose these kitchen towels and pillow. I would figure out what you want to splurge on and plan around that if you are decorating for the first time. If you decorate with candy canes and cranberries, you might not feel so bad about spending a little extra on a couple of things : )

 I absolute love decorating for Christmas but even more than that I love staying under budget when I decorate. So, figure out the colors that you like and run with it! You can easily have a very Christmasy looking home for the holidays without having to spend a ton of money. Thanks for reading! Head on over to Our Little Urban Life and say Hi! I'd love to hear from you!
And just because I can't help myself, here is a picture of Liam I took when I was babysitting. He's just too cute for me to not include a picture.
I absolute love decorating for Christmas but even more than that I love staying under budget when I decorate. So, figure out the colors that you like and run with it! You can easily have a very Christmasy looking home for the holidays without having to spend a ton of money. Thanks for reading! Head on over to Our Little Urban Life and say Hi! I'd love to hear from you!
And just because I can't help myself, here is a picture of Liam I took when I was babysitting. He's just too cute for me to not include a picture.

Monday, December 19, 2011
Julian Santiago
On Friday, December 16th, in the wee hours of the morning, my nephew was born. His name is Julian and he is beautiful. I was able to go see him on Saturday and Sunday and I can't believe how tiny he is! As I held him I tried to remember Liam when he was that small. At four months Liam weighs double what Julian does now. Crazy how fast they grow!
I am so happy for my sister and brother-in-law. They have an amazing journey ahead of them and they're going to rock this parenting thing. Congratulations to the new mama and papa! We love you, Julian.

I am so happy for my sister and brother-in-law. They have an amazing journey ahead of them and they're going to rock this parenting thing. Congratulations to the new mama and papa! We love you, Julian.
Guest Blog: Oh, Christmas Tree
While I'm off enjoying vacation time I have a few guest bloggers lined up to share their Christmas themed posts with you. Next up, Lauren of Becoming Vanderburg. She and her husband moved out to Denver shortly after we did to help out with our church plant. Enjoy her post!
Hey Glowing Light readers! This is Lauren, another crazy one who moved to cross-country to Denver this year with the Acevedos and the Summit. Since Kristel’s soaking up the sunshine and warmth of South Florida, I’m sharing a few thoughts on Christmas.
During our move from North Carolina, there was much that got tossed. One thing that did not was our Christmas tree stand. I grew up in Central Florida, and I remember my parents using this particular stand year after year to hold a live tree. Being that we lived in a warm climate, my family clung to feelings of “a traditional Christmas,” including a live tree. Thus – the stand. This particular stand held a wonderfully pine-scented, living tree by clamping the trunk in a red, metal bowl. It was held up by three green legs that screwed into the trunk. You know the kind, right? When my family moved from Florida to Tennessee, the stand went with. Dad’s traditional yells, foul language and general discontent about the stand also made it to Tennessee. Yet, we persisted. Christmas traditions, right? ;)
After college, when I moved out on my own, my parents “gifted” me with that Christmas tree stand so I could have a tree of my own in my apartment. For four years in North Carolina, the stand served me well with no fuss or muss. Why wouldn’t we take it to Colorado with us?
Fast forward to a couple of weeks ago. My husband, knowing my Christmas tradition of a live tree, took me to pick one out the Saturday after Thanksgiving. At 11:30 at night. That’s when The Christmas Tree Debacle of 2011 began.
1st mistake: Picking out a tree after normal tree-hours from a grocery store. None of the workers there knew how to re-bundle a tree after looking at it, so we just chose a tree that was still tied up and prayed it would work. It didn’t.
2nd mistake: Not bringing the stand with us to see if the tree would fit in it. It wouldn’t.
3rd mistake: Spending hours on Sunday afternoon sawing the trunk to try and fit it into the stand. We wanted to use the few daylight hours left of the weekend, so sandwiched between family leaving and going to church, we began to work on that Christmas tree.
Once we realized the trunk was too fat to fit in the stand, we began sawing off portions to wedge it into the stand. For 2 hours, I laid across the tree, which was laid across our deck furniture, holding it steady while Adrian sawed and sawed and sawed. Four big chunks made the trunk small enough, and after much ado – it was time.
4th mistake: We screwed the tree into the stand. Technically, we screwed two screws, and drove a long nail into the third leg, since we realized too late we had lost a screw in the move. That proved to be a costly mistake.
It wasn’t until after we had moved the tree inside and set it upright in the stand that we realized all the sawing had made the trunk lopsided. The tree wouldn’t stay up. Even tied up and leaning against the wall, there was no hope. Once again, we drug it outside to the deck to remove the tree from the stand and rectify the situation. Unfortunately, the 6-inch long nail didn’t come out from the trunk as easily as the two screws did. We wiggled and pried and tried our darndest. No use. Tree and stand were stuck together like dogs after mating (that’s for you, Kristel ;) So, Adrian spent another hour sawing off the bottom of the trunk (and the stand that was rigidly attached to it).
5th mistake: Repeating the third mistake. After much pounding and prying, we finally separated the stand from the lopsided part of the trunk. After church on Sunday, and after daylight was long gone, we were back on the deck – respectively holding the tree steady and sawing the trunk to make it small enough for the stand again.
6th mistake: Using three nails to hold the trunk and stand together. Since we had bent the legs prying the trunk and stand apart earlier, we figured three nails would work better than two screws and a nail. We were, once again, wrong.
7th mistake: Taking the tree (still bundled up) back inside the apartment.
8th mistake: Thinking if we just untied the tree maybe it would balance itself and would stand upright. It didn’t.
After literally hours upon hours spent sawing and wedging and prying that dang tree into that dang stand – it still wouldn’t cooperate. At some point in hour 4 or so, I heard that same Christmas tree stand elicit the same kind of language from my husband as it had from my father. Ah, traditions. Unlike my traditional family Christmas experience though – we admitted defeat in the VanderHouse. There was no way that tree was going to work with that stand. It just wouldn’t.
Tuesday night, Adrian once again picked up the tree and moved it to the deck. He once again sawed the trunk off to separate it from the stand. He once again pried the nails out of the sawed-off trunk. We threw the tree into the bed of our truck and, after all of it – we returned the tree to the store. We threw away the severely mangled Christmas tree stand that had been in my family for years. We got a new, smaller Christmas tree and we found a new, sturdier stand at the store. We tested the tree in the stand before we ever left the parking lot, and once we knew it would stand upright – we brought it all home. No sawing required.
I’m thankful to tell you we have been enjoying our fully-functional Christmas tree for a couple of weeks now. We’ve also kept part of the old tree – one of the many 5-inch sections of the sawed-off trunk – as a reminder. It’s sitting on our counter, nail still sticking out of it, and I’m reminded that sometimes – a square trunk won’t fit into a round hole, no matter how many ways you slice it.
Subscribe to:
Posts (Atom)